Tuesday, January 11, 2011

Sun Salutation (Surya Namaskar)

Sun Salutation is considered as the best exercise for human body. Surya Namaskar consists of important Yogasanas and Pranayama. The Pranayama and thus its advantages are skillfully incorporated in Surya Namaskar.
In all this Surya Namaskar is an appreciated exercise among people of all ages from kids to old age people. Surya Namaskar or Sun Salutation is the best way to burn the calories and reduce weight. It is often recommended for obesity.

Position 1 - INHALE
Inhale and maintain the position as shown in figure in standing position with hands joined together near chest, feet together and toes touching each other.

Position 2 - EXHALE 


Exhale and bend forward in the waist till palms touch the ground in line with the toes. Don't bend knees while performing. At first you may find it difficult to attain the ideal position but try to bend as much as possible without bending in knees.

Do's
          While exhaling bend forward in the waist
          Palms touching the ground, fingers pointing forward, thumbs at 90   degree angle
          Legs straight
          Try to touch the forehead to the knees
          Relax the neck

Don'ts
          Do not bend the knees
          Do not keep the neck tense


Position 3 - INHALE 

Inhale and take the left leg back with left toes on the floor, press the waist downwards and raise the neck, stretch the chest forward and push shoulders backwards. Keep the right leg and both the hands in the same position. Keep the right leg folded.

Do's
          Take the left leg backwards and touch the knee to the floor, keeping the toes erect.
          The knee of the right leg will be bent.
          The knee of the left leg should touch the ground.
          Drop the waist/ hips towards the floor.
          Gaze is upwards, both arms are straight.

Don'ts
          Do not bend the neck forward.
          Do not bend the elbows.


Position 4 - HOLD
Hold the breath and raise the knee of left leg. Take the right leg backwards and keep it close to the left leg. Straighten both the legs and both hands. Keep the neck straight and site fixed. Keep both the toes erect. Take care that the neck, spine, thighs and the feet are in a straight line.

Do's
          Take the right leg back and place it beside the left leg, keeping the toes erect.
          Keep the body in one straight line - plank position.
          Keep the arms straight.
          Gaze forward.

Don'ts
          Do not bend the arms.
          Do not look towards the floor.
          Do not drop the hips/waist towards the floor.
          Do not stick the buttocks into the air.
          Do not bend the knees.


Position 5 - EXHALE
Exhaling bend both the hands in elbows and touch forehead on the ground, touch the knees on the ground, keep both the elbows close to chest. The forehead, chest, both the palms, both the toes, knees should touch the ground and rest of the body not touching the floor. Since only eight parts rest on the ground , it is called ' Ashtanga' position.

Do's
          Bring the body towards the floor placing the 8 parts on the floor: Toes, knees, chest, palms, and forehead.
          Keep the hands close to the body, next to the shoulders.
          Keep the elbows pointed to the sky and close in to the body.

Don'ts
          Do not touch the thighs, hips, waist or abdomen to the floor.
          Do not touch the chin to the floor.
          Do not let the elbows fall away from the body.


Position 6 - INHALE
Inhale and straighten the elbows, stretch the shoulders upwards, press the waist downwards but dont bend the arms. Keep the knees and toes on the floor. Push the neck backwards and site upwards.

Do's
          Push the upper body upwards so that the arms are straight.
          Keep the fingers pointed forwards, palms on the ground, thumbs at 90 degree angle.
          Open the chest, pull the shoulders downwards.
          Drop the head and neck backwards and gaze upwards towards the sky.
          Keep the heels, legs and knees together.
          Keep the toes erect.

Don'ts
          Do not let the legs or heels be apart.
          Do not bend the elbows.
          Do not hunch the shoulders towards the ears.


Position 7 - HOLD
Hold the breath, bend the neck downwards and press the chin in the throat, push the body backwards and touch the heels on the ground, raise the waist upwards, do not move the palms on the floor.

Do's
          Push the body upward so the buttocks and waist are raised into the air, leaving the body in an Inverted‘V’ position.
          Take the head and chin towards the chest.
          Try to touch the heels to the floor.

Don'ts
          Do not bend the legs in the knees.
          Do not bend the arms.


Position 8 - HOLD
Hold the breath as in position 7, bring the right leg in the front and place it in between the hands like in position 3 but instead of left leg in the front here take right leg and place left leg in the back with left knee and toes on the ground.

Do's
          Take the right leg forward and place it between the hands.
          The knee of the right leg will be bent.
          The knee of the left leg should touch the ground.
          Drop the waist/ hips towards the floor.
          Gaze is upwards, both arms are straight.

Don'ts
          Do not bend the neck forward.
          Do not bend the elbows.


Position 9 - EXHALE
Exhale and bring the left leg forwards as in the position 2 and place it in between both the arms.

Do's
          Take the left leg forward and place it beside the right.
          Palms touching the ground, fingers pointing forward, thumbs at 90 degree angle.
          Legs straight.
          Try to touch the forehead to the knees.
          Relax the neck.

Don'ts
          Do not bend the knees.
          Do not keep the neck tense..


Position 10 - INHALE

Inhaling start getting up and attain the position as in position 1.

Extracted from: http://yogapoint.com


Monday, January 10, 2011

Bhujangasana

Half-bhujangasana
Full-bhujangasana
Benefits
  • Strengthens the spine
  • Stretches chest and lungs, shoulders, and abdomen
  • Firms the buttocks
  • Stimulates abdominal organs
  • Helps relieve stress and fatigue
  • Opens the heart and lungs
  • Soothes sciatica
  • Therapeutic for asthma
  • Traditional texts say that Bhujangasana increases body heat, destroys disease, and awakens kundalini.
  • This position helps in creating the necessary pressure to the adrenal glands which provides rich supply of blood for the entire body
  • Liver and other organs next to it also benefits from this asana. Problems of irregular menstrual cycles can be solved with this asana. 
  • The pressure applied on your stomach and muscles helps in relieving you from constipation problems.
  • Acute gas troubles are also resolved if the asana is done on a regular basis. 

A key point here is that you should not use your hands to push your torso upward. It should be your back and stomach muscles at work.

Counter Pose: Matsyasana

Pictures from: www.ifthekar.com, http://carrieanddanielle.com

Matsyasana

Matsyasana
Benefits of Matsyasana
·  Stretches the deep hip flexors and the muscles (intercostals) between the ribs.
·  Stretches and stimulates the muscles of the belly and front of the neck.
·  Stretches and stimulates the organs of the belly and throat.
·  Strengthens the muscles of the upper back and back of the neck.
·  Improves posture.

Picture from: www.my-yoga-blog.blogspot.com

Friday, January 7, 2011

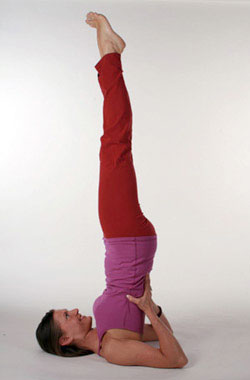
Sarvangasana

Sarvangasana literally means a pose for all the parts of the body. It is one of the many inverted poses of yoga, all of which are extremely beneficial. These inverted asanas work by reversing the effects of gravity on certain parts of the body, and in Sarvangasana, most parts of the body are targeted.

Circulation

Sarvangasana helps promote good
circulation, as it directs the flow of the entire lower body towards the heart. This asana also helps prevent and reduce varicose veins by reducing the pressure on the legs and directing blood clogged in the veins upwards to the heart.

Lungs

When we breathe, thanks to gravity our lower lungs get most of the oxygen, while our upper lungs don't. Only when we take a deep breath do our upper lungs get some oxygen. Inverted yoga asanas also direct oxygen to the upper lung, ensuring healthier lung tissue.

Heart

Usually
the heart has to work hard to ensure blood gets pushed upward to the brain. During Sarvangasana the heart gets relief as the blood is directly relayed to the brain.

Thyroid

The thyroid gland is located in the neck. Over a period of time due to lack of proper circulation the gland starts to deteriorate. Sarvangasana pushes healthy, oxygen-rich blood directly into the neck, strengthening the thyroid glands.

Here is the correct way to do this asana.
  1. Lie down flat on the floor, on your back, palms by your side facing
  2. Exhale and lift your legs up 30, then 60, then 90 and then around 130 degrees so they are extended behind your head.
  3. Stay in this position, breathing normally, for a few seconds.
  4. Now, gradually, exhale again, and straighten your legs up to 90 degrees, lifting your buttocks as well. Support the back of your trunk with your palms, keeping elbows on the floor. Gradually, walk your hands towards your shoulder blades, as you lift your body higher.
  1. Your elbows may tend to move outwards. Bring them in, so they are straight in line with your shoulders.
  2. You will notice that your hips tend to jut out backwards, while your feet tend to come forward over the head. This is not the right way to do it. Work at it so your body is in a straight line. Your hips, feet and shoulders should be aligned, so push your feet back and bring your hips and tailbone forward. Remember, this exercise is not as much about effort as it is about balance.
  3. Lift your body as high up as possible. Sarvangasana is a shoulder stand, so your body should be resting on your shoulders and not on your back.
  4. Hold this position for as long as possible.
  5. Remember to exhale while lifting your body up, but once your body is up, you can breathe normally. There is no need to hold your breath.
  6. Time yourself, so you can see how long you can remain in this position. The next time, try and balance your body for a little longer.

While this is the basic pose, here's what you can do to get more out of the asana:
  1. Make sure your legs are squeezed together. The feet, ankles, legs, thighs, should all be touching.
  2. Although you can extend toes towards the ceiling, the back of your
legs get a better stretch if you extend heels towards the ceiling instead.
  1. Do not move your head or turn it to either side when in this pose.

Caution

Women should not do any inverted poses during menstruation as it reverses blood flow. People suffering from blood pressure, glaucoma,
hernias, cardiovascular disease, cervical spondylitis, thrombosis, arteriosclerosis, and kidney problems should not practice headstand. Those suffering from neck injuries should perform this exercise after consulting a yoga teacher, under supervision.

Counter pose: Matsyasana

Extracts from: http://www.indiaparenting.com, http://mipsm.org